Setup Fizz Node
Setting up a Fizz node allows you to participate in the Spheron network and earn points by providing computational resources. This guide will walk you through the process of registering and setting up your Fizz node.
Registration Process
To begin, you must register your Fizz node on the Spheron network. Follow these steps:
-
Navigate to fizz.spheron.network in your web browser.
-
Look for and click on the “Register a Fizz Node” button to start the registration process.
-
You’ll be presented with a registration form. Fill it out carefully with the following information:
- Operating System: Select your node’s OS from the options provided (MacOS, Linux, or Windows).
- Node Type: Specify whether you’re setting up a GPU node or a CPU node. This determines the type of computational resources you’ll be providing.
- GPU Model (if applicable): If you selected GPU node, choose the specific GPU model you’re using.
- Resource Details: Provide accurate information about the resources you’re willing to lend, including:
- CPU cores
- RAM capacity
- Available storage
Learn more about how to check your system specs and resources in this Section.
- Region: Select the geographical location where your node is situated. This helps users choose nodes based on their proximity requirements.
- Gateway Selection: This is a crucial step. Choose a gateway carefully, considering factors such as:
- The number of fizz nodes connected to the gateway. A gateway can’t connect more than 2000 fizz node so select another gateway which is nearest to you.
- Proximity to the gateway, make sure you choose the gateway which is nearest to you so that the latency is not too high for users who want to use your GPU / compute.
- Try to select the recommended gateway in the list as the dashboard already selects the gateway based on your node preferences.
-
Now click on the “Register Your Fizz Node” button.
-
For the Stellar phase and beyond, you have two registration options:
Option 1: Stellar NFT Registration (Recommended)
- A deposit of 0.02 ETH to receive a Stellar NFT
- Get a 1.5x booster on all your points earned
- This can be deposited on any of our supported mainnet chains:
- Base
- Arbitrum
- ZkSync Era
- BNB Chain
- Ethereum
- The 1.5x booster significantly increases your earning potential and helps you progress through tiers faster
Option 2: Nebula NFT (Free Registration)
- Register your node without any deposit
- Run your node normally without any point multiplier
- Standard point earning without any boosters
We strongly recommend Option 1 (Stellar NFT) as the 1.5x booster provides substantial benefits to your earning potential and helps you progress through tiers much faster.
-
If you select the Stellar NFT, Click on “Proceed with Payment” button. Why taking a fee?
If you select the Nebula NFT (Free Registration), you can proceed directly to the next step without any payment.
-
Once you confirm the payment transaction (for Stellar NFT), your node will be officially registered in the Spheron network, and you can proceed to the next steps. No additional transactions are needed for either option.
Note: Please note that we have removed the transaction requirement going forward for both options. So that you don’t need to pay any gas fees for the registration. All the gas fees will be covered by the Spheron team.
Learn About Your System Specs / Resources
Mac Users: How to Check Your System Configuration
Before we start, you need to open something called the Terminal. It’s like a special notepad where you can type commands to talk to your computer. Here’s how to find it:
- Look for a magnifying glass icon at the top right of your screen. That’s called Spotlight.
- Click on it or simultaneously press the Command (⌘) key and Space bar.
- Type “Terminal” and press Enter.
- A white or black window will open. That’s the Terminal!
Now that you have the Terminal open, you can type these magic words (we call them commands) to learn about your computer:
-
Check Storage Type:
system_profiler SPStorageDataType -
Check Hardware Specifications:
system_profiler SPHardwareDataType -
Check GPU Type:
system_profiler SPDisplaysDataType
Linux Users: How to Check Your System Configuration
To use these commands:
- Click inside the Terminal window.
- Type or copy-paste one of the commands above.
- Press the Enter key.
- The computer will show you some information. That’s what we’re looking for!
-
Check Storage Information:
df -h -
Get Detailed Hardware Information:
sudo lshw -
List CPU Information:
sudo lshw -class processor -
List Memory Details:
sudo lshw -class memory
Running the Fizz Node Client (Linux or Mac)
After successfully registering your node, you need to set up and run the Fizz node client on your machine. This client software connects your node to the Spheron network and manages resource allocation. Follow these steps:
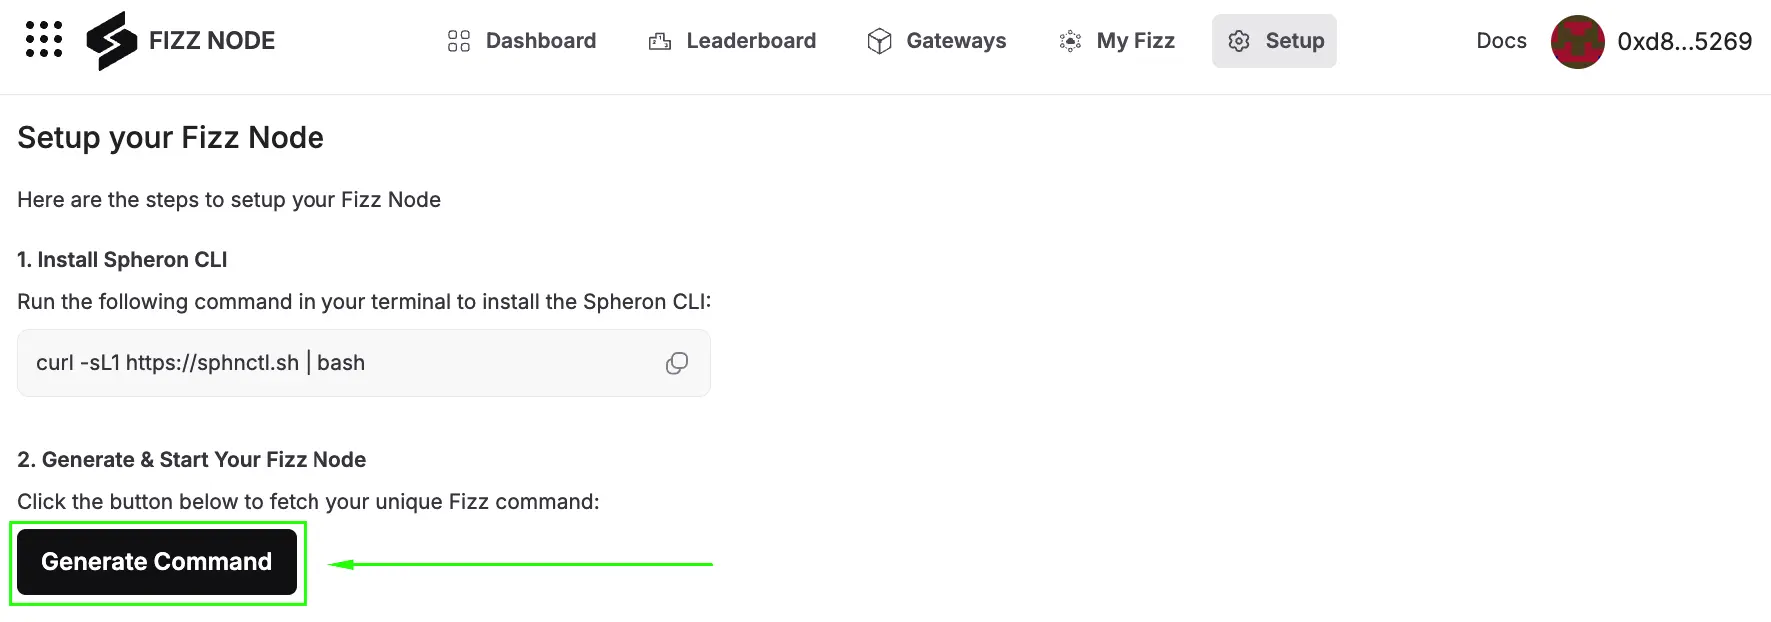
- Open your terminal or command prompt and run the following command in your terminal to install the Fizz CLI:
curl -sL https://sphnctl.sh | bash -
Go to the Setup page on the Fizz Website. Click “Generate Command” to obtain your node-specific commands.
-
Use the below command to start your node, replacing the
...with your node-specific token:
sphnctl fizz start --token ... If you’re experiencing Docker Hub rate limit errors while running your Fizz Node, you can authenticate using your Docker Hub credentials to bypass these limitations. This is particularly useful if you have a Docker Hub Pro account. To authenticate, use the following command format:
sphnctl fizz start --token <your-token> -u <dockerhub-username> -p <dockerhub-password-or-token>Replace:
<your-token>with your Fizz Node token<dockerhub-username>with your Docker Hub username<dockerhub-password-or-token>with your Docker Hub password or access token
Note: For security reasons, it’s recommended to use a Docker Hub access token instead of your password. You can generate an access token from your Docker Hub account settings.
- Monitor your node’s logs to ensure it is running smoothly:
sphnctl fizz logs - Verify that the CLI and node versions are up-to-date by running the following command:
sphnctl fizz version If your dashboard doesn’t reflect the updated version immediately, refresh the page. The version information should update within 2-3 minutes.
- Once you’ve verified the node is running, return to the setup page on the Spheron Fizz App.
- On the setup page, you’ll see a “Check Status” button and a switch to “Autocheck status.”
- Click the “Check Status” button to manually initiate a status check for your Fizz node. Or you can run the below command on CLI.
sphnctl fizz status - Alternatively, you can toggle on the “Autocheck status” switch to have the system periodically check your node’s status without manual intervention.
- The system will now perform checks to validate if your node is active and correctly configured.
The validation process may take a few minutes. During this time, the system verifies your node’s connectivity, resource availability, and configuration.
- Once your node is confirmed active, you will be automatically directed to your Fizz dashboard.
Running the Fizz Node Client (Windows)
- Before proceeding, ensure your NVIDIA drivers and CUDA version are up-to-date. Open your terminal and run:
nvidia-smi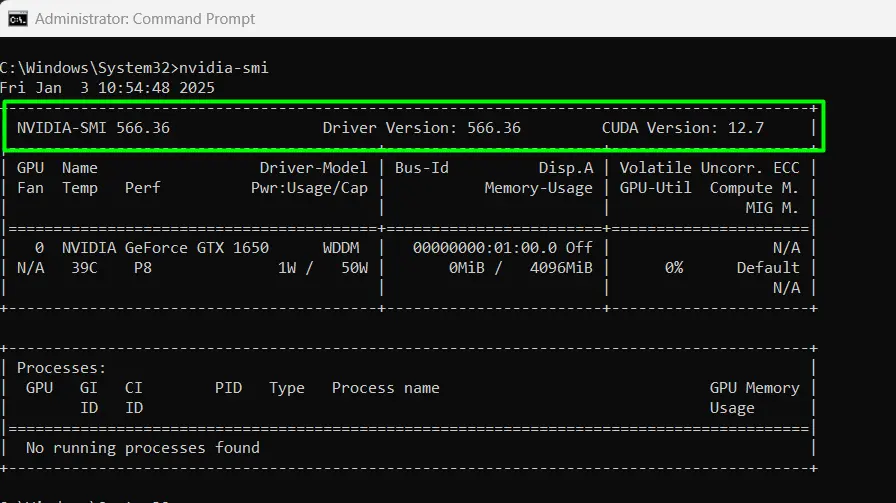
-
If an update is required, visit the official NVIDIA Drivers page to download and install the latest version.
-
If WSL is already enabled, skip this step. Open PowerShell as an administrator and execute:
wsl --install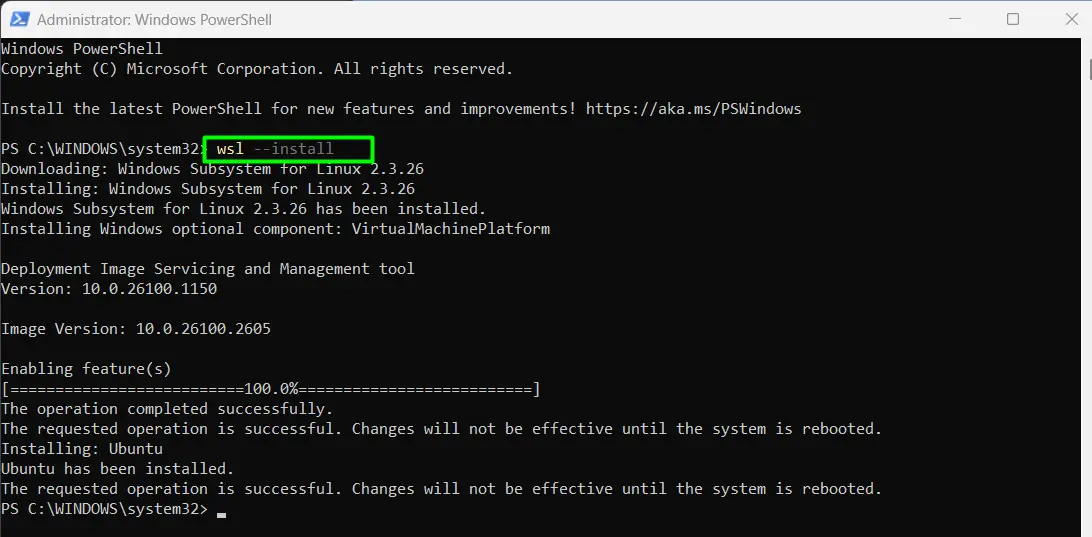
This will Enable WSL, Set WSL 2 as the default version and Install a default Linux distribution. Restart your system if prompted.
-
If your Linux distribution is outdated, install Ubuntu 22.04. Open the Microsoft Store and Search for Ubuntu 22.04. Install it.
-
If Docker Desktop is already configured for WSL, skip this step. Download Docker Desktop from the official website. During installation, select Use WSL 2 instead of Hyper-V. Restart if prompted.
-
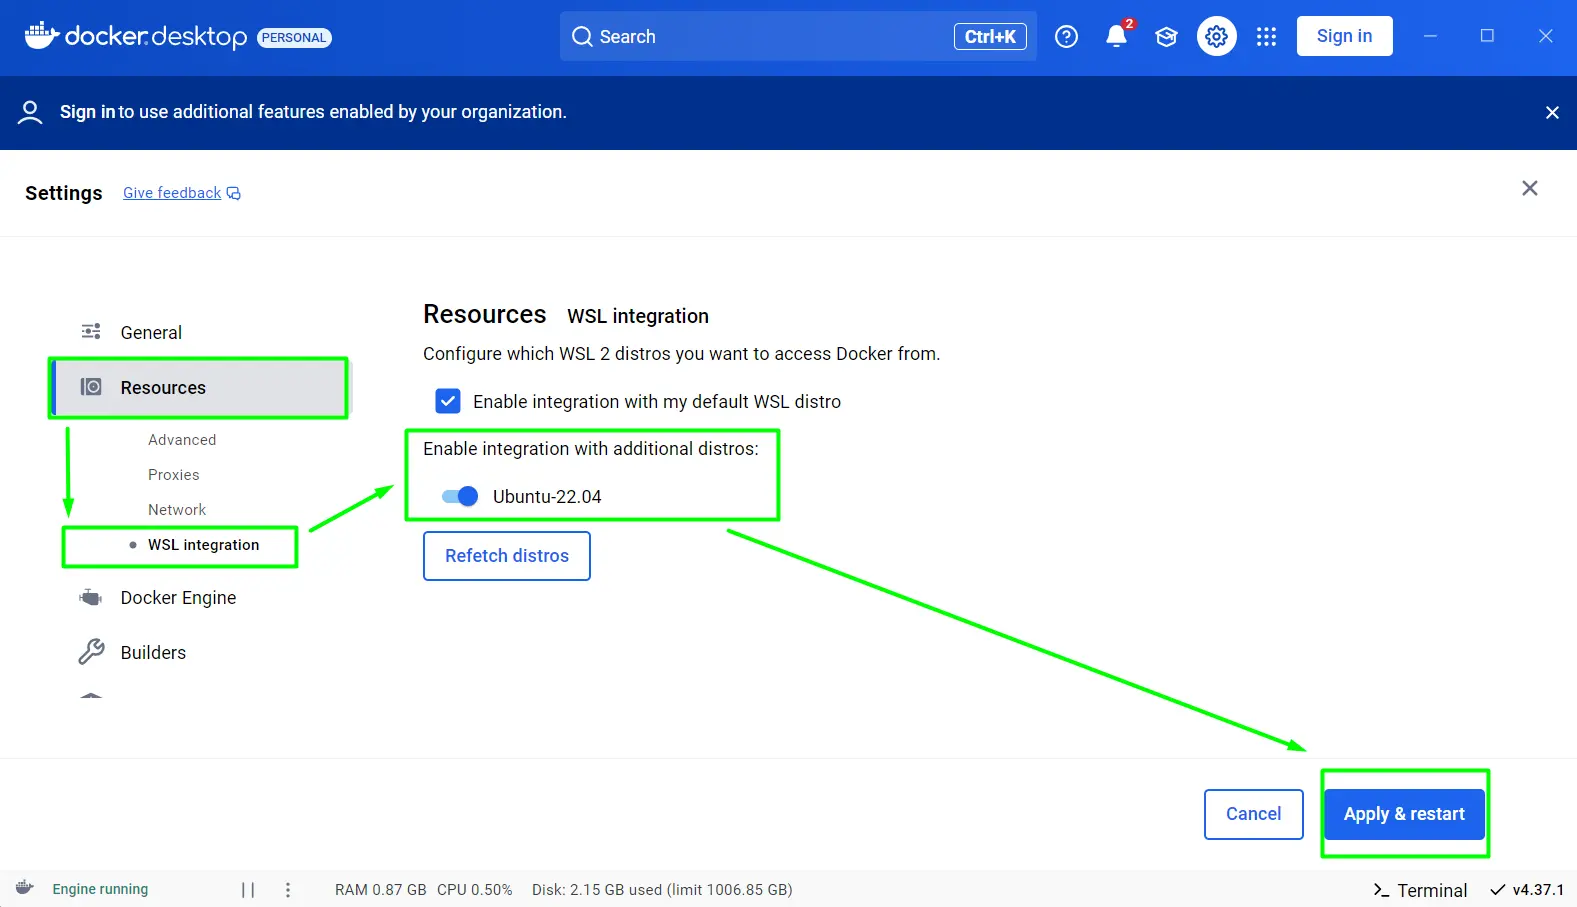
Open Docker Desktop and Go to Settings > General. Ensure WSL 2 is selected as the backend. Enable integration with Ubuntu. Click “Apply & Restart”.

-
Go to Resource > WSL Integration > Enable Ubuntu. Click “Apply & Restart”.
8 Launch Ubuntu as Administrator & Run the following command to install the Spheron CLI
curl -sL https://sphnctl.sh | bash-
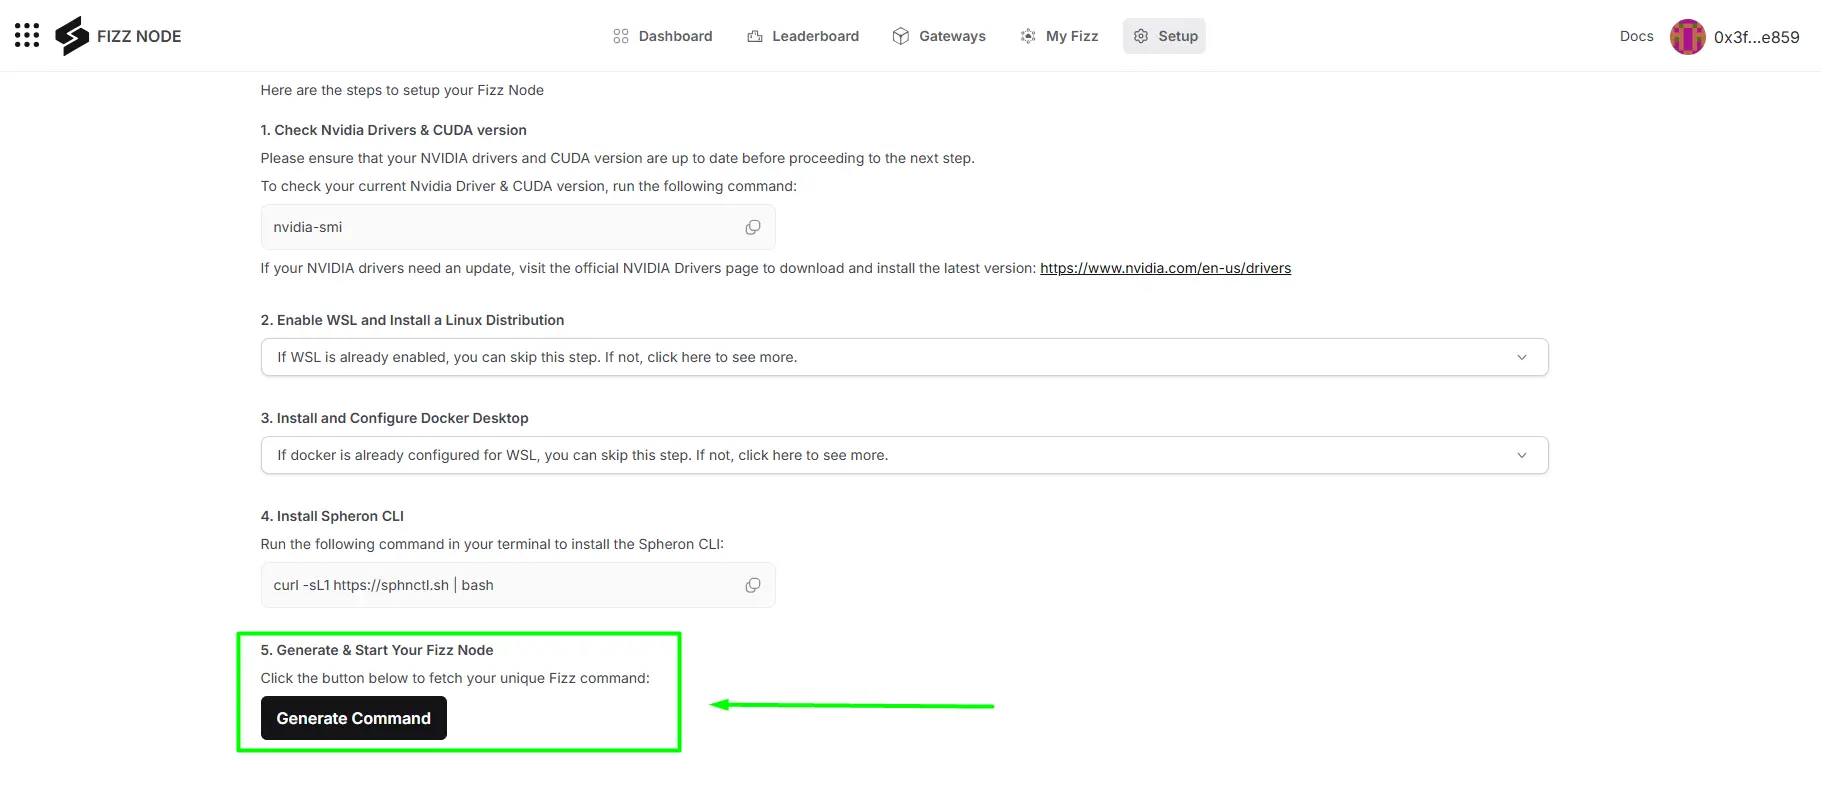
Go to the Setup page on the Fizz Website. Click “Generate Command” to obtain your node-specific commands.
-
Use the below command to start your node, replacing the
...with your node-specific token:
sphnctl fizz start --token ... If you’re experiencing Docker Hub rate limit errors while running your Fizz Node, you can authenticate using your Docker Hub credentials to bypass these limitations. This is particularly useful if you have a Docker Hub Pro account. To authenticate, use the following command format:
sphnctl fizz start --token <your-token> -u <dockerhub-username> -p <dockerhub-password-or-token>Replace:
<your-token>with your Fizz Node token<dockerhub-username>with your Docker Hub username<dockerhub-password-or-token>with your Docker Hub password or access token
Note: For security reasons, it’s recommended to use a Docker Hub access token instead of your password. You can generate an access token from your Docker Hub account settings.
- Monitor your node’s logs to ensure it is running smoothly:
sphnctl fizz logs - Verify that the CLI and node versions are up-to-date by running the following command:
sphnctl fizz version If your dashboard doesn’t reflect the updated version immediately, refresh the page. The version information should update within 2-3 minutes.
- Once you’ve verified the node is running, return to the setup page on the Spheron Fizz App.
- On the setup page, you’ll see a “Check Status” button and a switch to “Autocheck status.”
- Click the “Check Status” button to manually initiate a status check for your Fizz node. Or you can run the below command on CLI.
sphnctl fizz status - Alternatively, you can toggle on the “Autocheck status” switch to have the system periodically check your node’s status without manual intervention.
- The system will now perform checks to validate if your node is active and correctly configured.
The validation process may take a few minutes. During this time, the system verifies your node’s connectivity, resource availability, and configuration.
- Once your node is confirmed active, you will be automatically directed to your Fizz dashboard.
Running Your Node with Privileged Mode
Running in Privileged Mode gives the user higher access to your host system, allowing them to run workloads with full permissions. This makes it easier for users to install dependencies that may not be possible in a normal container workspace.
Using privileged mode increases your chances of being selected for deployments, which in turn can help you earn more fees.
However, with elevated permissions comes increased risk. A user could potentially deploy harmful workloads that might compromise your system. Only enable privileged mode if you are certain that your machine does not contain any personal or sensitive data.
Any compromises that happen due to this mode, Spheron Network won’t be liable or held accountable.
To reduce risks and ensure stability, we enforce a one-active-workload policy: only one deployment can run at a time. This prevents one user’s activity from interrupting or affecting another’s.
Linux/Mac Command
sphnctl fizz start --privileged --token ... Windows Command
sphnctl fizz start --privileged --token ... Security Warning: Privileged mode grants elevated permissions to user workloads. Only enable this feature if you understand the risks and your machine doesn’t contain sensitive data.
Accessing Your Dashboard
After your node has been successfully validated and marked active, you’ll be redirected to the main Fizz node dashboard. This dashboard is your control center for managing your node and tracking your earnings. Here’s what you can expect:
-
Node Status: Real-time information about your node’s activity and health.
-
Resource Utilization: Graphs and statistics show how your node’s resources are used.
-
Earnings Tracker: A detailed breakdown of your points and earnings from providing resources to the network.
-
Settings and Configuration: Options to adjust your node’s resource settings or modify available resources.
-
Node Status: Provides real-time information about your node, including its current state (Active or Inactive), uptime, geographical location, and operating system. Also, you can view your node’s unique identifier, associated address, and CLI status.
-
Upgrade Notification: Alerts you to update your Fizz Node to the latest version to maintain optimal performance and avoid penalties like losing FN points. Includes a direct link to the setup page for easy upgrading.
-
Resource Tiers: Displays your progress across various tiers, highlighting achievements and current tier level. For example, an “Lunar Fizz Operator” badge signifies special recognition for Phase 2 Fizzers.
-
Points Summary: Shows key metrics, including the Phase 1 CPU Multiplier, points earned per era, and total points.
-
Resource Allocation: Detailed insights into your node’s resources, including CPU, RAM, and Storage, with values for utilized, allocatable, and claimed resources.
-
Bandwidth Usage: A live gauge shows your node’s current bandwidth performance.
-
Gateway Information: Displays the active gateway your node is connected to, such as “spheron-testnet.”
Check your dashboard regularly to ensure your node performs optimally and stay informed about your earnings in the Spheron network.
Remember to keep your node running and maintain a stable internet connection to maximize your deployment opportunities and earnings.